Parcourir cette discussion :
1 Utilisateurs non enregistré en ligne
Accessoires F6 |
||||
|---|---|---|---|---|
|
Régulier
 
|
Je suis à la recherche d'accessoires pour mon F6
ex Pots échappement,marre que les poteaux en HD fasse plus de bruit que moi,j'aimerais leur faire écouter un vrai moteur quelqu'un peut il me renseigner merci les gars
Date de publication : 07/10/2009 17:24
|
|||
 
|
||||
|
||||

Re: Accessoires F6 |
||||
|---|---|---|---|---|
|
Webmaster
 
|
Ben qu'est ce que tu veux exactement, les accessoires sont trés nombreux encore que cela va en s'ammenuisant car la moto n'est plus prduite, donc il est difficile de te tirer un catalogue.
Pour les échappements il n'y a plus que deux sortes existantes encore trouvable : - Celui d'origine (aisément modifiable - Le Cobra 6*6 qui on peut le dire est assurément trés agréable pour certain et Casse bonbon pour les autres. Pour voir ce que cela donne du bord de la route regarde ici le petit film que nous avions fait pendant les terres de l'homme, la premiere partie est en son d'origine + musique, met un peu de volume et tu auras une bonne idée du Cobra c'est les deux qui crachent le plus :cliques ici pour écouter des Cobra A noter que tu peux aussi obtenir un son sympa avec celui d'origine avec quelques modifs bien faites. Pour le reste, regarde mes annonces, il y a les marques qui fabriquent qui sont énumérées. FiFi
Date de publication : 07/10/2009 17:59
|
|||
|
||||
Re: Accessoires F6 |
||||
|---|---|---|---|---|
|
Régulier
|
Merci Fifi
pour les cobras super pour les modifs je serais preneur de conseils n'étant pas vraiment mécanicien si tu peux m'aiguiller merci ds le cas ou tu passe sur Bourges tu as mon tel on est pas très loin A+
Date de publication : 07/10/2009 21:21
|
|||
|
|
||||
|
||||
|
Anonymes
|
Re: Accessoires F6 |
|||
|---|---|---|---|---|
|
Pour les modifs voilà ton bonheur - je les ai faites et ça change bien le son sans le rendre casse c.......
C'est en anglais masi facile à piger. Si tu as du mal on peut t'aider. Bonne lecture 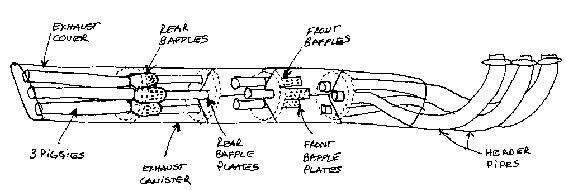 This drawing shows very well the inside of the exhaust system. From left to right, it starts with the Exhaust Cover. Inside the cover you will find the three Piggies that are welded to the Exhaust Canister. Inside the Canister are the Rear Baffles (3) that consist of three pipes each one with a mini Glass Pack (silencers). At the end of each Baffle there are the Baffles Plates. If you insert a stick through a Piggy pipe it will stop when touch that Plate. After the plate there is an empty compartment and after, the Front Baffle system starts. This is very similar to the Rear Baffle system and each pipe has a Plate at the end. After the Front Baffles there is another empty space and then you will reach the end of the Canister, where the Header Pipes are welded 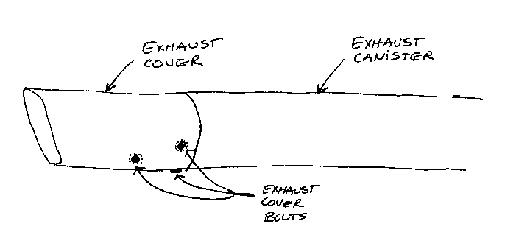 Killing the Three Piggies This process will not require any carburetor modifications nor re-jetting. It is very important to understand that this is a process that will modify the original exhaust system so you will need to check how this may affect the warranty of the bike. Several people reported that there is no problem with the bike warranty, just with the exhaust warranty but please check with your local dealer. This is a safe and inexpensive process to improve the sound pitch and level and avoid purchasing expensive pipes that will change colors after some time, giving an uneven look to the pretty chrom look of the Valk. This drawing show the Exhaust Cover. There are three 8mm bolts that holds it, one is connected to the lower Piggy and the other two are connected to the Canister. Release the three bolts to expose the Piggies. You need to cut the Piggies as close to the canister as possible using a hack saw or whatever you have at hand. The science here is just cut them. You may do the three but remember that this will cause that the one that has the bracket where the Cover bolt is attached will be loosed. The remaining two bolts are more than enough to hold the cover in place with no problem at all, so go ahead and cut all Piggies. Now replace the Cover and fire the baby. Listen to the sound while running the bike. The sound will be a bit fuller and deeper, since it will resonate inside the Covers. I want to make clear that will NOT sound louder, just the pitch will be noticed. I used a decibel meter and didn't register a noticeaable increase. If you still want more sound, go to the next step. 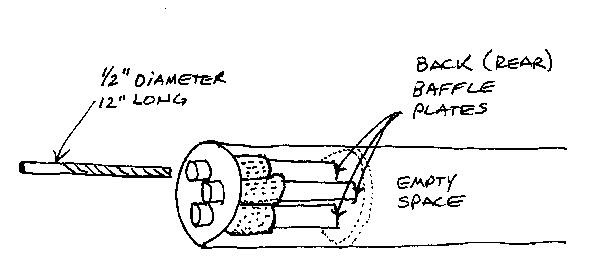 Rear Baffles Drill This process will not require any carburetor modifications nor re-jetting. This picture show the Piggies already cut almost flushed to the Canister. Inside the Canister are the Baffles attached to a metal piece that hold them. If you use a long dowel or long screw driver and insert it through one of the holes, it will stop when reached the end of the baffle. There is a piece of metal at that end that will be refered as Baffle Plates. Using a long (at least 12" long) drill bit, drill the Baffle Plates. Please use a new bit and don't push too hard. Make is softly since we don't want too many residues to drop inside the Canister. The major sound level impact will be experienced when drilling the first one on each side. The sound will be louder but not obnoxious. It will sound throatier and deeper. Go step by step remembering to drill both exhaust at the same time. Once the six (three on each side) Baffle Plates are drilled and you still want more sound, then go to the next step. 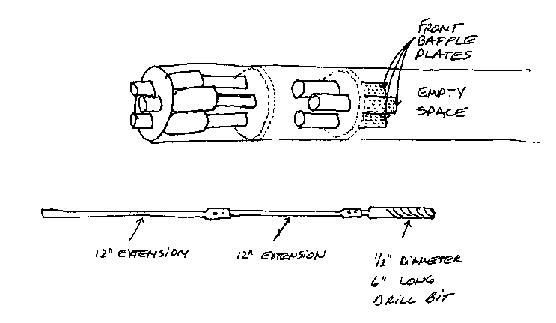 Rear Baffles Drill After some research, it is recommended to proceed with the next step in the other page, the "Ragnar Cut", before this drilling the front baffles. There will be more sound level impact by performing the "Ragnar Cut" and there will be no shimming nor re-jetting required. Also, after taking out the rear bafflex completely, will be a lot easire to drill the front baffles if you still decide to go ahead with this modification. This process will not require any carburetor modifications nor re-jetting. This involves drilling the Front Baffle Plates. To do it, you will need a very long drill bit, at least 20" long. Since it is very hard to find, I'll show you my idea. It consist of attaching together two drill bit 12" extensions that are very easy to find on any hardware store. Please be sure that the connection is very strong since we don't want any piece to drop inside the Canister. Once both pieces are tight together, insert a 6" long 1/2" diameter drill bit at the end. With this new hardware, insert it through the Rear Baffle holes until reaching the Front Baffle Plates. Follow the previous procedure very careful and step by step. You will experience a little louder, deeper and throatier sound. You will agree with me that there is no BIG difference but many people stops here. |
||||
|
||||
|
Anonymes
|
Re: Accessoires F6 |
|||
|---|---|---|---|---|
|
tu as le sur mesure aussi
 A+ gilles Joindre un fichier:  251_4aab962fb8e96.jpg (682.00 KB) 251_4aab962fb8e96.jpg (682.00 KB) |
||||
|
||||
Re: Accessoires F6 |
||||
|---|---|---|---|---|
|
Membre du
 
|
Une t'ite présentation dans la rubrique ad'hoc(va voir dans le forum:présentation des membres, post d'accueil des nouveaux puis présentation des nouveaux membres),avant de partir à la pêche aux renseignements, ce serait sympa non ?
T'as déjà rempli ton profil et mis des belles photos dans ton album,t'es à moitié pardonné  Alors on recommence au début: Bienvenue Lilian 
Date de publication : 07/10/2009 22:05
|
|||
 |
||||
|
||||
Re: Accessoires F6 |
||||
|---|---|---|---|---|
|
Webmaster
|
Ben si tu passes même chose et avant de percer quoi que ce soit viens par là un week end et je te ferais écouter en réel les solutions 1 et 2 de John sur les deux motos du garage.
1) les premieres chicanes sont percées (l'interstate) 2) les deuxiemes chicanes aussi (la baggervalk) Et pour modifier le son on peut aussi modifier la forme de l'arriere du pot. On pourra mettre les tubes arrieres standart sur les deux motos et les tubes de l'inter sur les deux aussi, puis des extensions 18 pouces sur les deux aussi, comme cela tu te rendra bien compte des choses. Par contre je ne peux pas monter à Bourges avec les deux ah ah ah d'autant que une n'a pas encore sa carte grise. Dans les deux cas c'est assez fun moins gonflant que les cobra pour tous y compris pour la marée chaussée, et par rapport à tes potos en Harley cela peut le faire aussi surtout quand tu les laisses sur place ah ah ah!! FiFi
Date de publication : 07/10/2009 22:45
|
|||
|
||||
|
Anonymes
|
Re: Accessoires F6 |
|||
|---|---|---|---|---|
|
et puis tes potoss en Harley ils vont entendre un orchestre Symphonique
ça va les changer du poum poum poum  |
||||
|
||||
Re: Accessoires F6 |
||||
|---|---|---|---|---|
|
vieux sage
 
|
j'ai ce qu'il te faut
 tu perces la première chicane, puis après essais, la 2ème au besoin, mais là il faut refaire une carburation tu passe en gicleurs de 100, tu vire la mousse dans l'entrée du filtre a air, un filtre K&N, puis trigger à 4,3° (juste retailler l'ergot de la trigger) et là …… rahhhh  Joindre un fichier: Foret 17 ralong�.jpg (552.55 KB)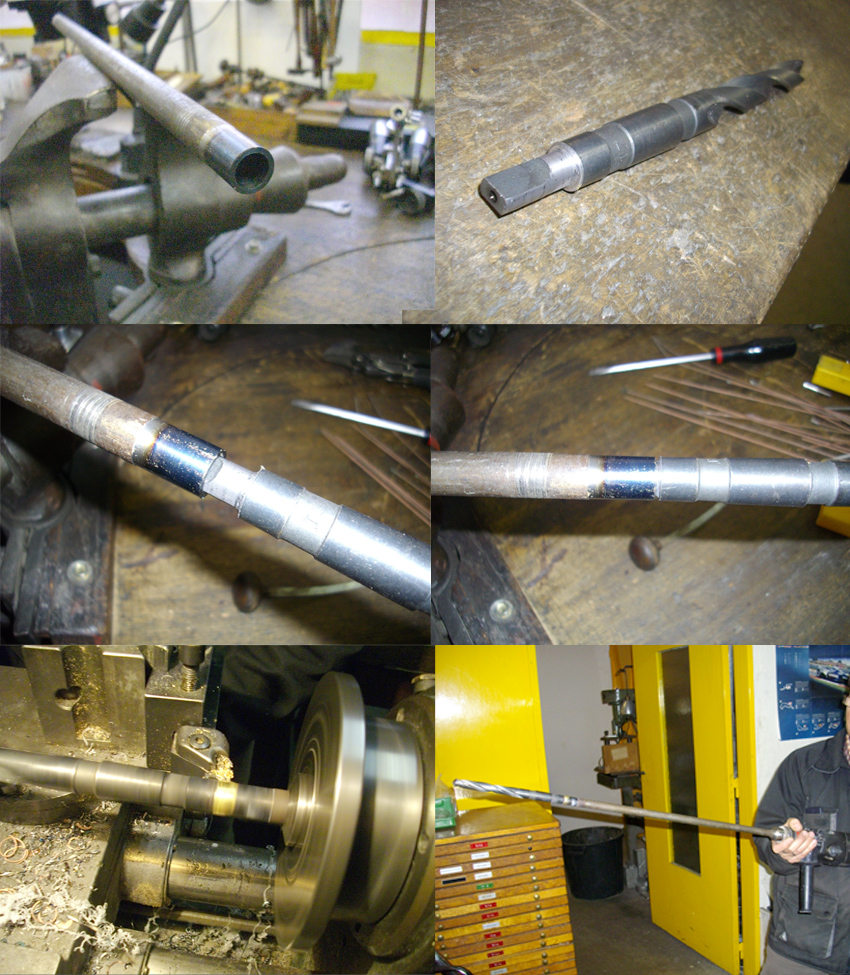
Date de publication : 08/10/2009 10:18
|
|||
|
||||
Re: Accessoires F6 |
||||
|---|---|---|---|---|
|
Membre du
|
  elle est votre carrie ma petite dame??  
Date de publication : 08/10/2009 11:11
|
|||
|
||||
Re: Accessoires F6 |
||||
|---|---|---|---|---|
|
très honorable
 
|
Concurrence !! concurrence !! sans être inscrit au conseil de l'ordre , ça va lui coûter cher !
si je sors une chignole comme çà , je peux fermer le cabinet !!!
Date de publication : 08/10/2009 15:35
|
|||

|
||||
|
||||
|
Anonymes
|
Re: Accessoires F6 |
|||
|---|---|---|---|---|
|
Citation :
 non non tu peux percer la deuxième chicane sans toucher au réglage carburation moi j'ai rien réglé et crois moi ça tourne comme une horloge |
||||
|
||||